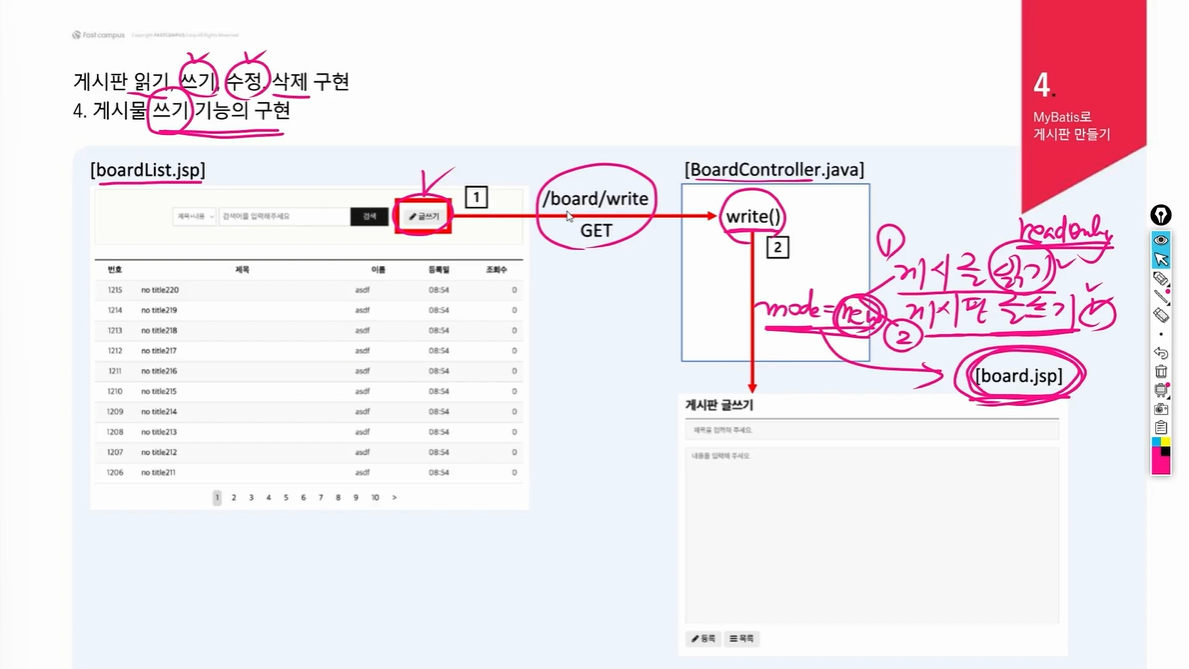
1. 게시물 쓰기 기능의 구현
- boardList.jsp에 글쓰기 버튼을 추가하고 누르면 Get방식으로 BoardController에 write()메서드를 불러오고 write()메서드는 board.jsp에서 게시판 글쓰기 뷰를 불러온다.
- boardList.jsp
<%@ page language="java" contentType="text/html; charset=UTF-8"%>
<%@ taglib uri="http://java.sun.com/jsp/jstl/core" prefix="c" %>
<!DOCTYPE html>
<html>
<body>
<head>
<meta charset="UTF-8">
<title>fastcampus</title>
<link rel="stylesheet" href="<c:url value='/css/menu.css'/>">
<script src="https://code.jquery.com/jquery-3.7.1.min.js"></script>
</head>
<div id="menu">
<ul>
<li id="logo">fastcampus</li>
<li><a href="<c:url value='/'/>">Home</a></li>
<li><a href="<c:url value='/board/list'/>">Board</a></li>
<li><a href="<c:url value='/login/login'/>">login</a></li>
<li><a href="<c:url value='/register/add'/>">Sign in</a></li>
<li><a href=""><i class="fas fa-search small"></i></a></li>
</ul>
</div>
<script>
let msg = "${msg}"
if(msg=="DEL_OK") alert("성공적으로 삭제되었습니다.");
if(msg=="DEL_ERR") alert("삭제에 실패했습니다.")
</script>
<div style ="text-align:center">
<button type="button" id="writeBtn">글쓰기</button>
<table border="1">
<tr>
<th>번호</th>
<th>제목</th>
<th>이름</th>
<th>등록일</th>
<th>조회수</th>
</tr>
<c:forEach var="boardDto" items="${list}">
<tr>
<td>${boardDto.bno}</td>
<td><a href="<c:url value='/board/read?bno=${boardDto.bno}&page=${ph.page}&pageSize=${ph.pageSize}'/>">${boardDto.title}</a></td>
<td>${boardDto.writer}</td>
<td>${boardDto.reg_date}</td>
<td>${boardDto.view_cnt}</td>
</tr>
</c:forEach>
</table>
<br>
<div>
<c:if test="${ph.showPrev}">
<a href="<c:url value='/board/list?page=${ph.beginPage-1}&pageSize=${ph.pageSize}'/>"><</a>
</c:if>
<c:forEach var="i" begin="${ph.beginPage}" end="${ph.endPage}">
<a href="<c:url value='/board/list?page=${i}&pageSize=${ph.pageSize}'/>">${i}</a>
</c:forEach>
<c:if test="${ph.showNext}">
<a href="<c:url value='/board/list?page=${ph.endPage+1}&pageSize=${ph.pageSize}'/>">></a>
</c:if>
</div>
</div>
<script>
$(document).ready(function(){
$('#writeBtn').on("click",function (){
location.href="<c:url value='/board/write'/>";
});
});
</script>
</body>
</html>- JQuery를 사용할때는 JQuery를 페이지에 추가해줘야한다.
- BoardController 클래스에 @PostMapping으로 write메서드를 연결
    @PostMapping("/write")
    public String write(BoardDto boardDto, HttpSession session, RedirectAttributes rattr, Model m){
        String writer = (String)session.getAttribute("id");
        boardDto.setWriter(writer);

        try {
            int rowCnt =  boardService.write(boardDto);

            if(rowCnt!=1)
                throw new Exception("Write failed");

            rattr.addFlashAttribute("msg", "WRT_OK");

            return "redirect:/board/list";
        } catch (Exception e) {
            e.printStackTrace();
            rattr.addFlashAttribute("boardDto", boardDto);
            rattr.addFlashAttribute("msg", "WRT_ERR");
            return "board";
        }
}- board.jsp
<%@ page language="java" contentType="text/html; charset=UTF-8"%>
<%@ taglib uri="http://java.sun.com/jsp/jstl/core" prefix="c" %>
<!DOCTYPE html>
<html>
<head>
<meta charset="UTF-8">
<title>fastcampus</title>
<link rel="stylesheet" href="<c:url value='/css/menu.css'/>">
<script src="https://code.jquery.com/jquery-3.7.1.min.js"></script>
</head>
<body>
<div id="menu">
<ul>
<li id="logo">fastcampus</li>
<li><a href="<c:url value='/'/>">Home</a></li>
<li><a href="<c:url value='/board/list'/>">Board</a></li>
<li><a href="<c:url value='/login/login'/>">login</a></li>
<li><a href="<c:url value='/register/add'/>">Sign in</a></li>
<li><a href=""><i class="fas fa-search small"></i></a></li>
</ul>
</div>
<script>
let msg=${msg}
if(msg=="WRT_ERR") alert("게시물 등록에 실패했습니다. 다시 시도해 주세요.")
</script>
<div style ="text-align:center">
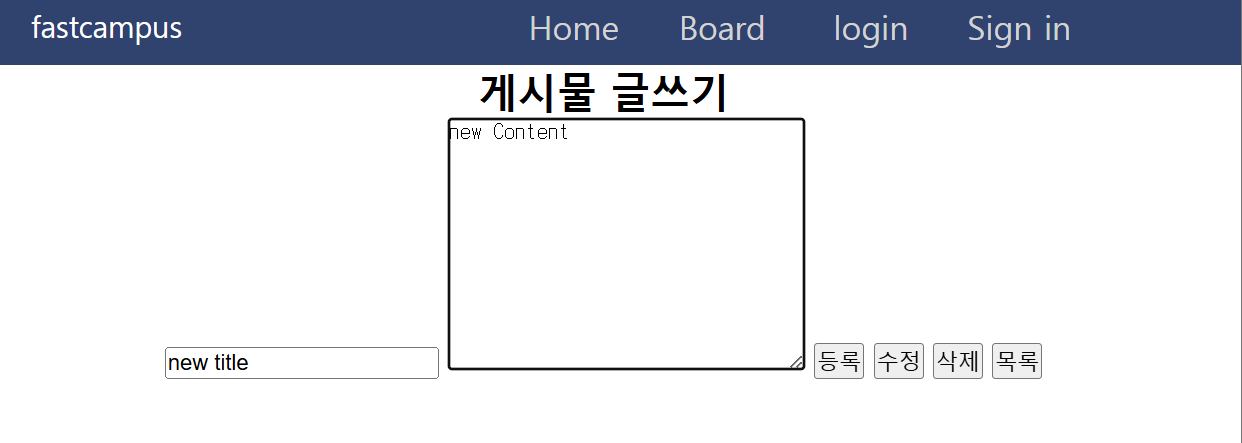
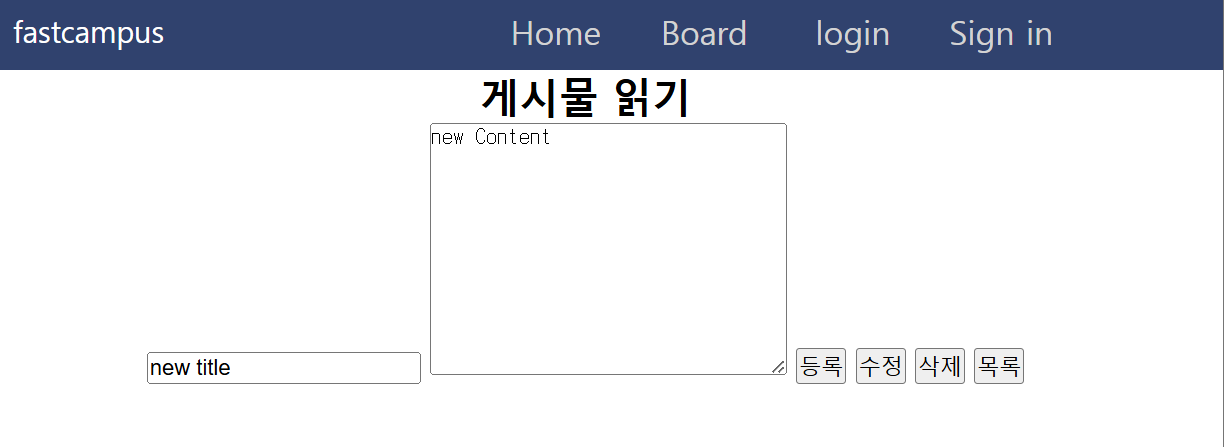
<h2>게시물 ${mode=="new" ? "글쓰기" : "읽기"}</h2>
<form action="" id="form">
<input type="hidden" name="bno" value="${boardDto.bno}" readonly="readonly"}>
<input type="text" name="title" value="${boardDto.title}" ${mode=="new" ? '' : 'readonly="readonly"'}>
<textarea name="content" id="" cols="30" rows="10" ${mode=="new" ? '' : 'readonly="readonly"'}>${boardDto.content}</textarea>
<button type="button" id="writeBtn" class="btn">등록</button>
<button type="button" id="modifyBtn" class="btn">수정</button>
<button type="button" id="removeBtn" class="btn">삭제</button>
<button type="button" id="listBtn" class="btn">목록</button>
</form>
</div>
<script>
$(document).ready(function(){ // main()
// listBtn을 클릭하면 일어날일을 정의
$('#listBtn').on("click", function(){
// board/list로 돌아가기
location.href = "<c:url value='/board/list'/>?page=${page}&pageSize=${pageSize}";
});
$('#removeBtn').on("click",function(){
if(!confirm("정말로 삭제하시겠습니까?")) return;
// id가 form인 요소에 대한 참조를 얻어서 form에 저장
let form = $('#form');
form.attr("action", "<c:url value='/board/remove'/>?page=${page}&pageSize=${pageSize}");
form.attr("method", "post");
form.submit();
});
$('#writeBtn').on("click", function (){
let form = $('#form')
form.attr("action", "<c:url value='/board/write'/>");
form.attr("method", "post");
form.submit();
});
});
</script>
</body>
</html>- writeBtn을 추가하고 클릭시 실행될 함수를 만들어준다.
<%@ page language="java" contentType="text/html; charset=UTF-8"%>
<%@ taglib uri="http://java.sun.com/jsp/jstl/core" prefix="c" %>
<!DOCTYPE html>
<html>
<body>
<head>
<meta charset="UTF-8">
<title>fastcampus</title>
<link rel="stylesheet" href="<c:url value='/css/menu.css'/>">
<script src="https://code.jquery.com/jquery-3.7.1.min.js"></script>
</head>
<div id="menu">
<ul>
<li id="logo">fastcampus</li>
<li><a href="<c:url value='/'/>">Home</a></li>
<li><a href="<c:url value='/board/list'/>">Board</a></li>
<li><a href="<c:url value='/login/login'/>">login</a></li>
<li><a href="<c:url value='/register/add'/>">Sign in</a></li>
<li><a href=""><i class="fas fa-search small"></i></a></li>
</ul>
</div>
<script>
let msg = "${msg}"
if(msg=="WRT_OK") alert("성공적으로 등록되었습니다.");
if(msg=="DEL_OK") alert("성공적으로 삭제되었습니다.");
if(msg=="DEL_ERR") alert("삭제에 실패했습니다.");
</script>
<div style ="text-align:center">
<button type="button" id="writeBtn">글쓰기</button>
<table border="1">
<tr>
<th>번호</th>
<th>제목</th>
<th>이름</th>
<th>등록일</th>
<th>조회수</th>
</tr>
<c:forEach var="boardDto" items="${list}">
<tr>
<td>${boardDto.bno}</td>
<td><a href="<c:url value='/board/read?bno=${boardDto.bno}&page=${ph.page}&pageSize=${ph.pageSize}'/>">${boardDto.title}</a></td>
<td>${boardDto.writer}</td>
<td>${boardDto.reg_date}</td>
<td>${boardDto.view_cnt}</td>
</tr>
</c:forEach>
</table>
<br>
<div>
<c:if test="${ph.showPrev}">
<a href="<c:url value='/board/list?page=${ph.beginPage-1}&pageSize=${ph.pageSize}'/>"><</a>
</c:if>
<c:forEach var="i" begin="${ph.beginPage}" end="${ph.endPage}">
<a href="<c:url value='/board/list?page=${i}&pageSize=${ph.pageSize}'/>">${i}</a>
</c:forEach>
<c:if test="${ph.showNext}">
<a href="<c:url value='/board/list?page=${ph.endPage+1}&pageSize=${ph.pageSize}'/>">></a>
</c:if>
</div>
</div>
<script>
$(document).ready(function(){
$('#writeBtn').on("click",function (){
location.href="<c:url value='/board/write'/>";
});
});
</script>
</body>
</html>- boardList.jsp에 등록성공을 넣어준다.
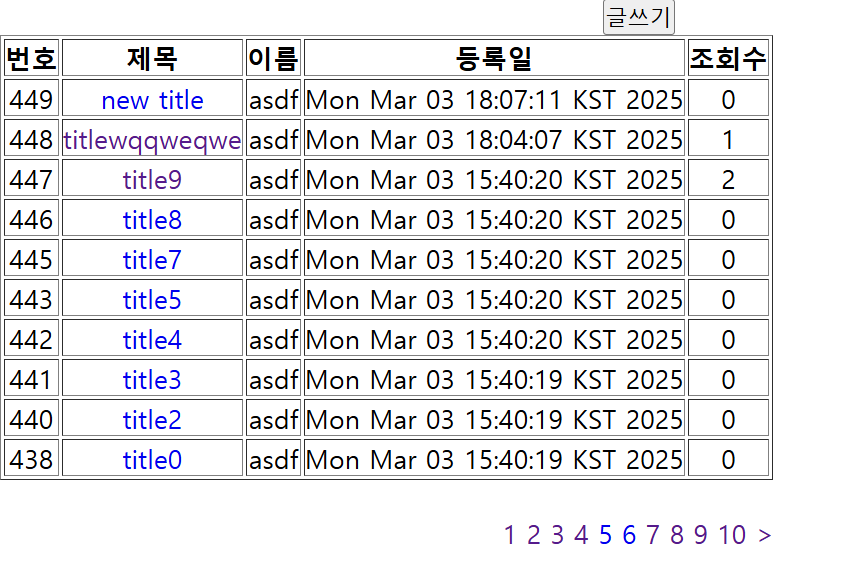
- 등록을 해주면...
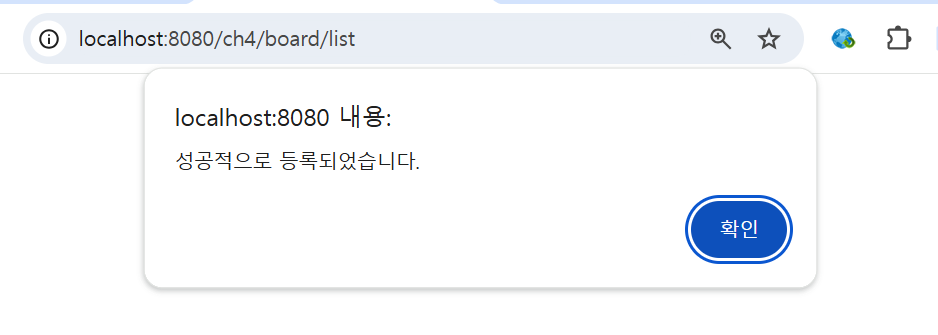
- 등록완료
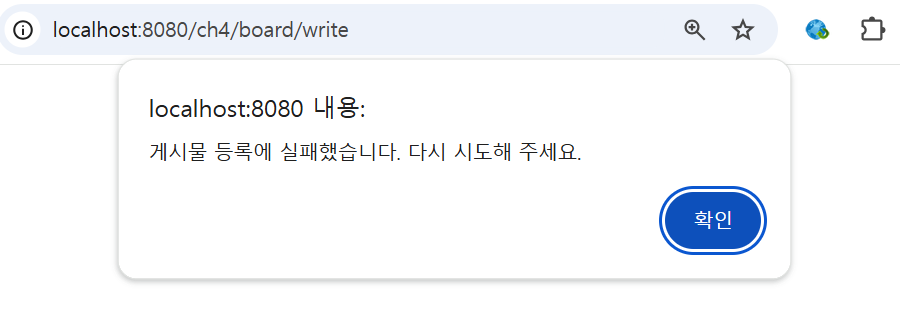
- write에서 에러를 일부러 발생시켜서 에러페이지 확인
    @Override
    public int write(BoardDto boardDto) throws Exception {
        throw new Exception("test");
//        return boardDao.insert(boardDto);
}- 오류가 발생해서 rattr.addFlashAttribute("msg", "WRT_ERR") 문장에 값이 들어오지 않았는데...
- RedirectAttributes는 redirect로 값을 넘겨주기때문에 write메서드에 return 값을 redirect로 고쳐줘야했다.
@PostMapping("/write")
public String write(BoardDto boardDto, HttpSession session, RedirectAttributes rattr, Model m){
String writer = (String)session.getAttribute("id");
boardDto.setWriter(writer);
try {
int rowCnt = boardService.write(boardDto);
if(rowCnt!=1)
throw new Exception("Write failed");
rattr.addFlashAttribute("msg", "WRT_OK");
return "redirect:/board/list";
} catch (Exception e) {
e.printStackTrace();
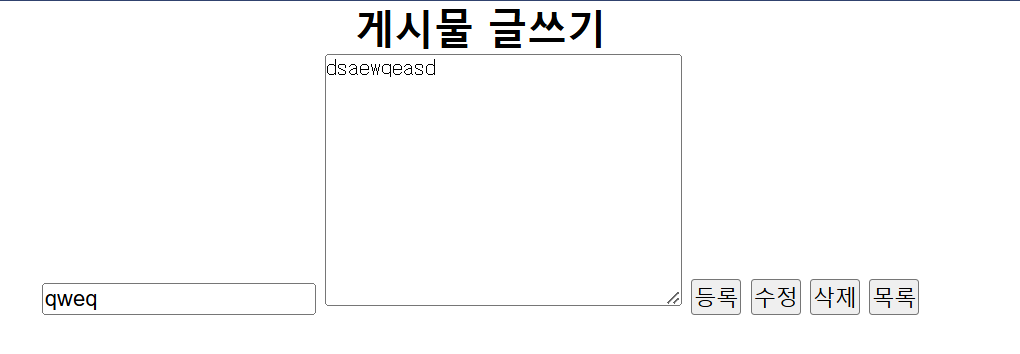
rattr.addFlashAttribute("boardDto", boardDto);
rattr.addFlashAttribute("msg", "WRT_ERR");
return "redirect:/board/write";
}
}- 등록 실패가 잘 나오고
- 입력했던 내용들이 남아있다.
2. 게시물 수정 기능의 구현
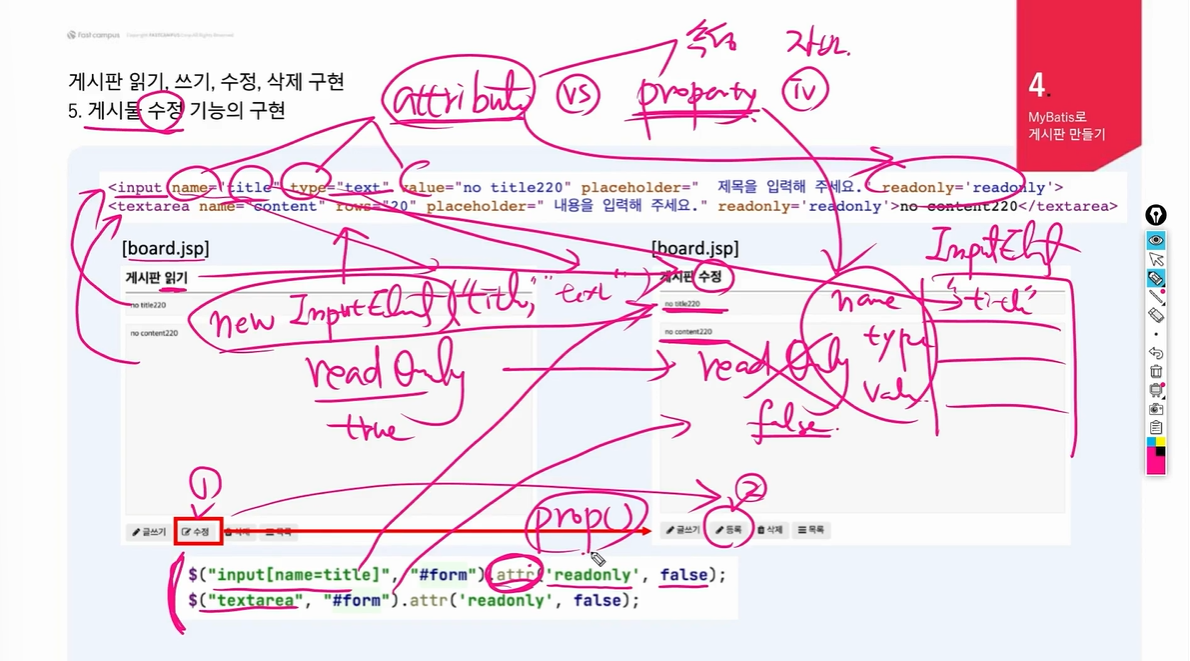
- attribute : html태그의 속성
- property : 생성된 객체의 속성
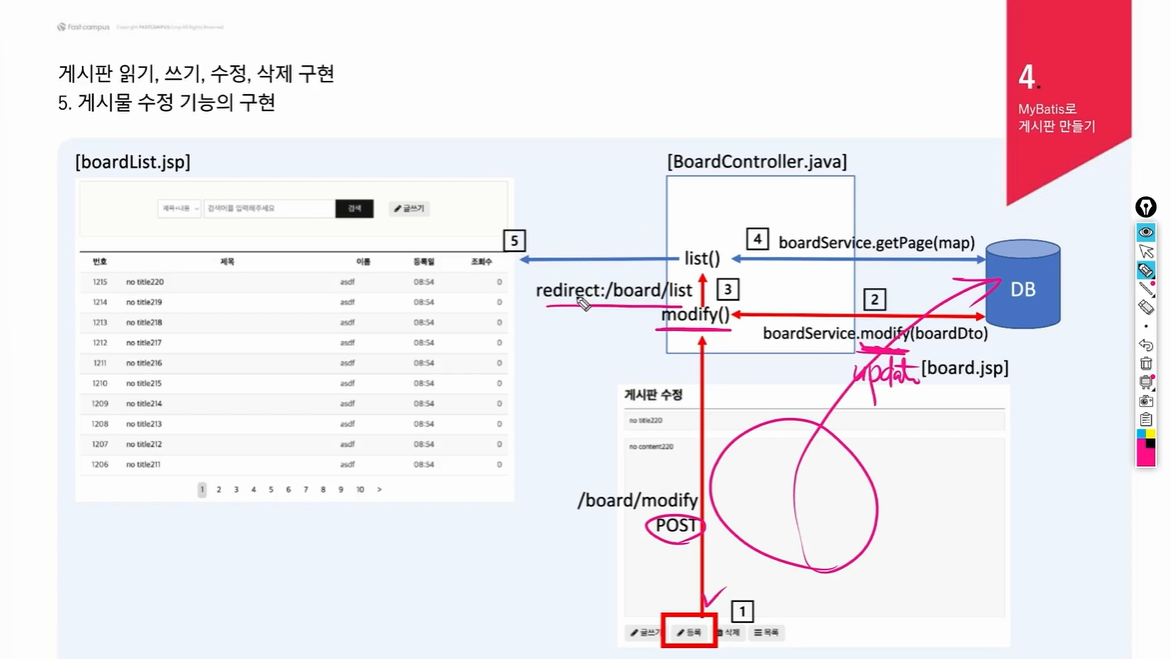
- boder.jsp에 script modify를 추가
<script>
    $(document).ready(function(){   // main()
        // 수정 버튼
        $('#modifyBtn').on("click", function(){
            // 1. 읽기 상태이면 수정 상태로 변경
            let form = $('#form');
            let isReadOnly = $("input[name=title]").attr('readonly');

            if(isReadOnly==true){
                $("input[name=title]").attr('readonly', false); // title
                $("textarea").attr('readonly', false);  // content
                $('#modifyBtn').html("등록");
                $("h2").html("게시물 수정");
            }

            // 2. 수정 상태이면, 수정된 내용을 서버로 전송
            form.attr("action", "<c:url value='/board/modify'/>");
            form.attr("method", "post");
            form.submit();
        });
        // listBtn을 클릭하면 일어날일을 정의
        $('#listBtn').on("click", function(){
            // board/list로 돌아가기
            location.href = "<c:url value='/board/list'/>?page=${page}&pageSize=${pageSize}";
        });
        $('#removeBtn').on("click",function(){
            if(!confirm("정말로 삭제하시겠습니까?")) return;
            // id가 form인 요소에 대한 참조를 얻어서 form에 저장
            let form = $('#form');
            form.attr("action", "<c:url value='/board/remove'/>?page=${page}&pageSize=${pageSize}");
            form.attr("method", "post");
            form.submit();
        });
        $('#writeBtn').on("click", function (){
            let form = $('#form')
            form.attr("action", "<c:url value='/board/write'/>");
            form.attr("method", "post");
            form.submit();
        });
    });
</script>- 에러가 나서 F12를 누르고 Sources에서 중단점을 걸고 등록을 눌러보았다.
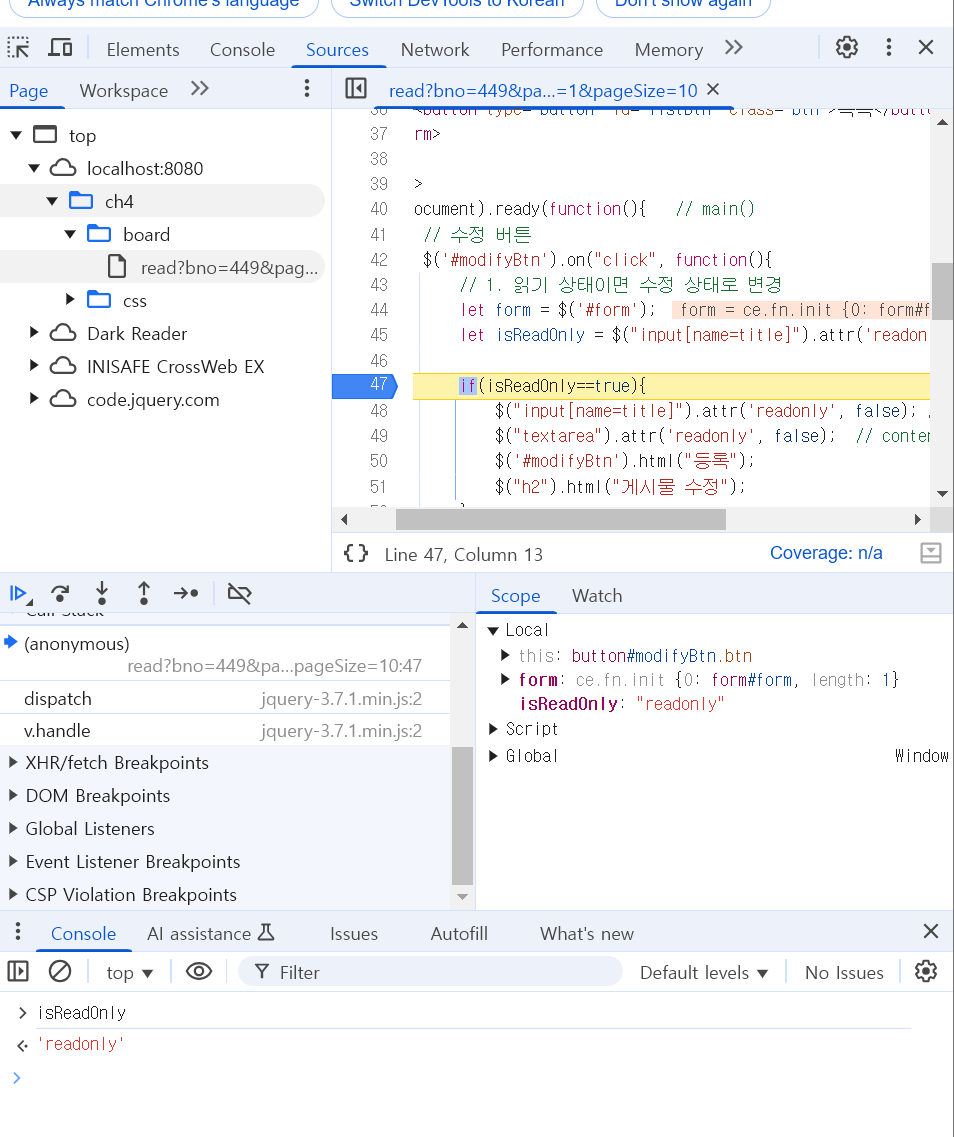
- isReadOnly에 'readonly'값이 들어오는 모습
// 수정 버튼
$('#modifyBtn').on("click", function(){
    // 1. 읽기 상태이면 수정 상태로 변경
    let form = $('#form');
    let isReadOnly = $("input[name=title]").attr('readonly');

    if(isReadOnly=='readonly'){
        $("input[name=title]").attr('readonly', false); // title
        $("textarea").attr('readonly', false);  // content
        $('#modifyBtn').html("등록");
        $("h2").html("게시물 수정");
         return;
    }

    // 2. 수정 상태이면, 수정된 내용을 서버로 전송
    form.attr("action", "<c:url value='/board/modify'/>");
    form.attr("method", "post");
    form.submit();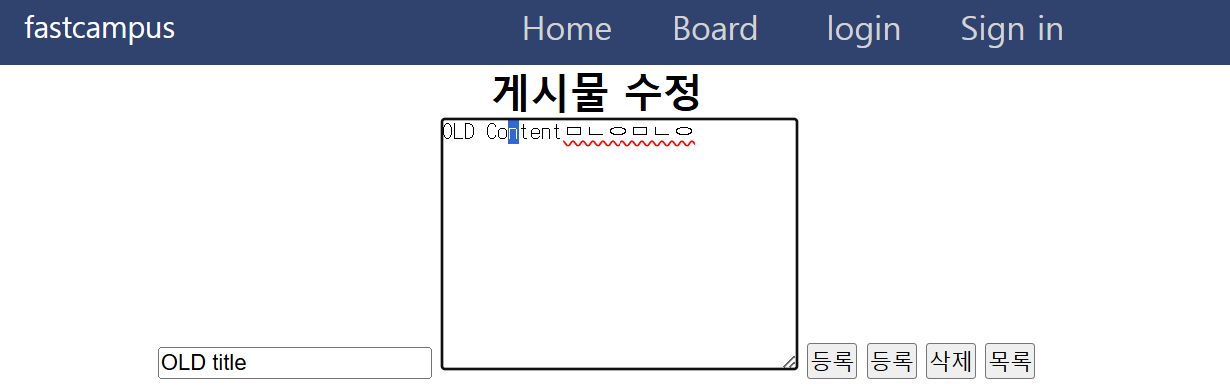
});- modifyBtn 스크립트를 고쳐주고 다시 수정을 눌러보면...
- 수정이 잘된다.
'MyBatis' 카테고리의 다른 글
| 8. SpringBoot로 페이징과 CRUD 작성 - 패스트캠퍼스 백엔드 부트캠프 3기 (2) | 2025.03.05 |
|---|---|
| 7. SpringBoot로 MyBatis연동하기 - 패스트캠퍼스 백엔드 부트캠프 3기 (1) | 2025.03.04 |
| 5. 게시판 읽기, 쓰기, 삭제, 수정 기능구현(1) - 패스트캠퍼스 백엔드 부트캠프 3기 (2) | 2025.03.03 |
| 4. 게시판 목록 만들기와 페이징/TDD (2) - 패스트캠퍼스 백엔드 부트캠프 3기 (0) | 2025.02.28 |
| 3. 게시판 목록 만들기와 페이징/TDD (1) - 패스트캠퍼스 백엔드 부트캠프 3기 (0) | 2025.02.27 |